About me and the things I love

About Me...
Take A Look!
Things To Do Today:
- 1. Be Happy
- 2. Be Nice
- 3. Create Art
- 4. Drink Lots of Coffee!!
- 5. Enjoy Friends
- 6. Love Family
- 7. Make a Positive Difference in Someone's Life
Followers
My Blog List
-
-
-
-
-
-
Winterwonderland – Teil 974 years ago
-
Letterjournal 124 years ago
-
-
-
-
-
-
-
-
-
Art Journal Page, "Perspective"7 years ago
-
-
-
-
-
-
-
-
-
-
-
-
-
-
-
-
-
-
-
-
art fundraiser11 years ago
-
-
-
-
-
-
-
-
-
Help!12 years ago
-
-
-
NEW BLOG ADDRESS: FOR NOW!13 years ago
-
-
-
-
-
-
Merry Christmas!15 years ago
-
-
-
-
GOODBYE AND THANK-YOU16 years ago
-
-
-
-
-
-
-
-
-
-
Fun Art Challenge Sites
- 2createart Challenge
- Alphabet Challenge
- Art Creations Friday
- ATC Wednesday
- Collage Play With Crowabout
- Crazy Amigo Challenge - Tuesday
- Created Byhand Challenge - Tuesday
- DansMa Maison Il Ya
- Ink On My Fingers - Sunday Stamping Challenge
- Lots To Do Challenge
- Make a Moo or Two - Thursday
- Mixed Media Monday Challenge
- Rosies & Linda's Big Art Adventure
- Saturday Surprise Challenge
- Saturday's Workout
- Small World of Inchies Challenge
- Sunday Postcard Challenge
- Tag Tuesday
- Thank God It's Friday Challenge
- The Next Step Challenge Blog
- Theme Thursday Challenge
- Think Monday - Think ATC
- TIO - Tag It On Wednesday Challenge
- Wednesday Stamper
VERY FUN STUFF TO TRY...
Choose the language of your choice to read my blog!
www.flickr.com
This is a Flickr badge showing public photos from luvs2create2. Make your own badge here.
Blog Archive
- February 2013 (2)
- October 2012 (1)
- July 2012 (1)
- March 2012 (2)
- October 2011 (1)
- September 2011 (1)
- August 2011 (3)
- July 2011 (1)
- May 2011 (3)
- November 2010 (1)
- October 2010 (1)
- September 2010 (2)
- August 2010 (2)
- July 2010 (2)
- June 2010 (2)
- May 2010 (10)
- April 2010 (8)
- March 2010 (5)
- February 2010 (1)
- January 2010 (7)
- June 2009 (1)
- May 2009 (7)
- April 2009 (7)
- September 2008 (3)
- July 2008 (1)
- June 2008 (3)
- May 2008 (2)
- April 2008 (2)
- March 2008 (1)
- February 2008 (1)
- January 2008 (4)
- December 2007 (2)
- November 2007 (1)
- October 2007 (7)
- September 2007 (1)
- August 2007 (32)
- July 2007 (3)
- June 2007 (4)
- May 2007 (4)
- March 2007 (5)
- February 2007 (17)
- January 2007 (3)
- December 2006 (8)
- November 2006 (4)
- October 2006 (14)
- September 2006 (11)
- August 2006 (3)
- July 2006 (2)
- June 2006 (4)
- April 2006 (1)
- March 2006 (8)
- February 2006 (1)
- January 2006 (4)
- December 2005 (3)
- November 2005 (4)
- October 2005 (7)


7 comments:
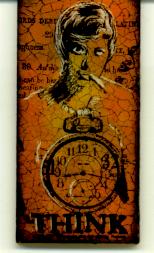
OH MY goodness these just rock!! will have to tell me all about how you did them but love the girl one best and she has all the colors that I love very cool dear!!! wishing I was there to play too!!!
Hugs Linda
So, do you have one of those lovely boots, too? I didn't know.
Love the house chunky book and these scratch board pieces! Any tutorials on the scratch board stuff??? Please??? (Insert big, brown puppy dog eyes, here. It always works for Steven! ha!)
Oh My...I do love these! Tell me how!!!???????
OK Vicci, here goes!!
These were so easy you won't believe it! The white clayboard is such a great surface to work on! The finished product kind of reminds me of using alcohol inks on dominoes but easier.
Basic supplies you need: several colors of dye based ink pads (any brand---I used Adirondac), a permanant black pad (I used Memories Black), a scratching tool (I bought a cheap one for $6.00) & make up sponges.
Optional extras: Clear Embossing Powder, spray sealer (matte or glossy), Diamond Glaze, & Metallic Leafing pens.
Use sponges to dab or smear and blend two or three colors of ink on scratch board. Work fast because the dye ink drys really quick. Next, stamp image(s) with black ink. Use scratch tool to define some of the areas of the stamped image. On the crow I selected feathers, whites of the eye, beak and feet. The scratching gives it real depth. I overstamped with a crackle stamp to give it an aged look. I sponged the edges with the black ink and I was done!!!
The optional things you can do: Highlight and edge with metallic pens. Clear emboss over the whole top (requires at least two coats---first coat is too bumpy). Spray with glossy or matte sealer. Cover with Diamond Glaze.
Hope this explains it---have fun creating :)
hugs, shari xxx
These are fabulous! What type of board did you use? I've never heard of scratch board or clayboard. Matte-board I know! ha Thanks for the instructions. I will be trying this as soon as I find this type board.
These look great.
Shari, Thanks for the reminder about these little scratchboards. I have done some landscapes with these and was bored with that, but yours are way cooler. I just did a little one, and you are right - they are fun.
Post a Comment